


October 5, 2026
Connect DNS: automatic setup with Cloudflare
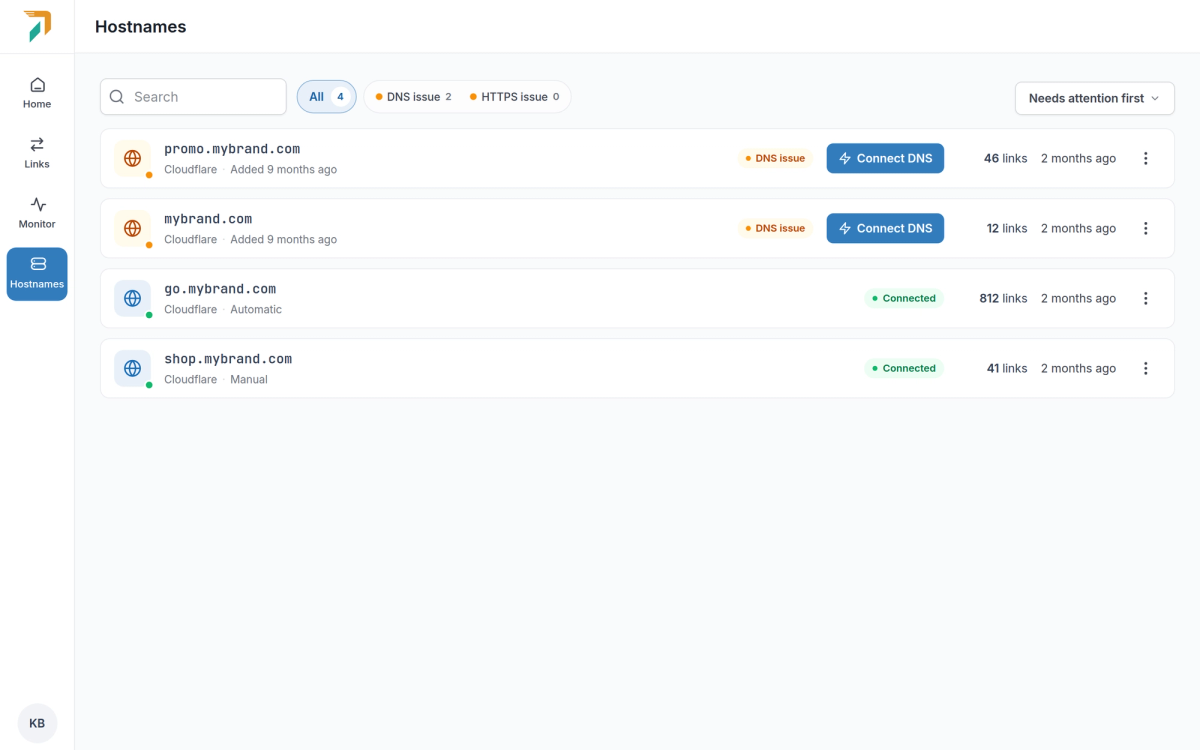
Hostnames → Connect DNS
Every hostname that doesn’t point to RedirHub yet now has a Connect DNS button. It opens one window that shows where your DNS is hosted, what is missing and the quickest way to fix it.
Automatic setup with Cloudflare#
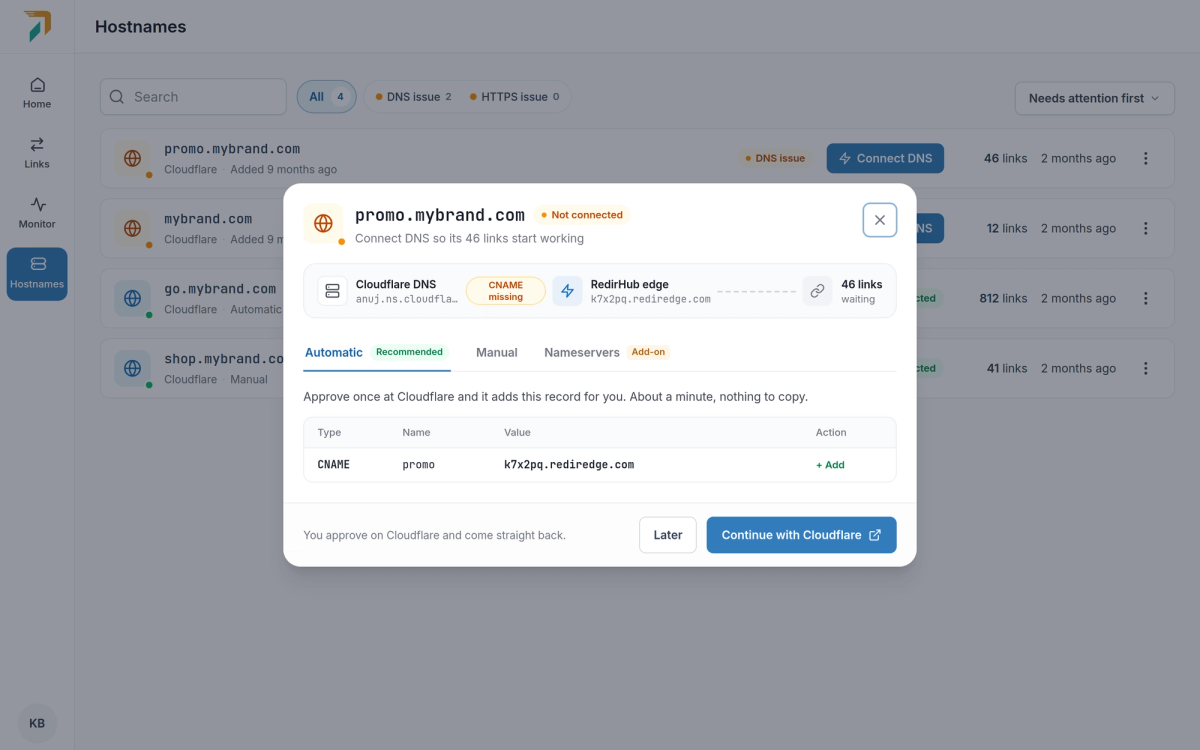
Connect DNS → Automatic
If your DNS is at Cloudflare, choose Continue with Cloudflare. RedirHub shows the exact records first, then Cloudflare asks you to approve them. There are no API keys to create, and the approval is one-time: RedirHub gets no lasting access to your Cloudflare account.
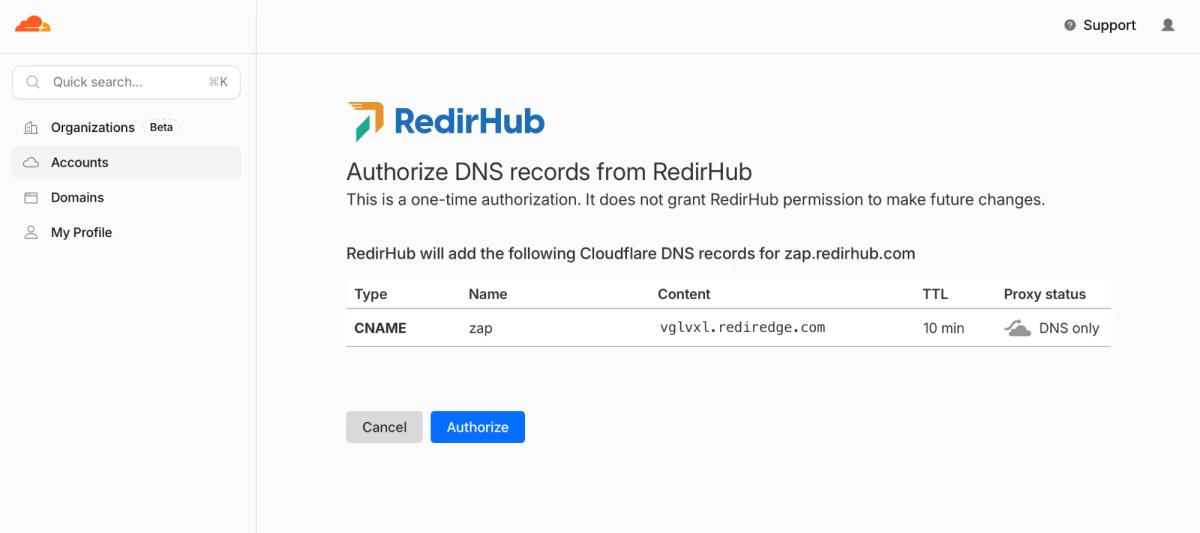
Cloudflare asks you to approve the records once
- Subdomains. One CNAME record, added as DNS only so traffic reaches RedirHub directly.
- Root domains. The A record on the root is pointed at RedirHub and a TXT record is added to confirm the domain is yours. Email (MX) and every other record stay as they are.
- www included. Connecting a root domain also connects its www version, unless you untick it.
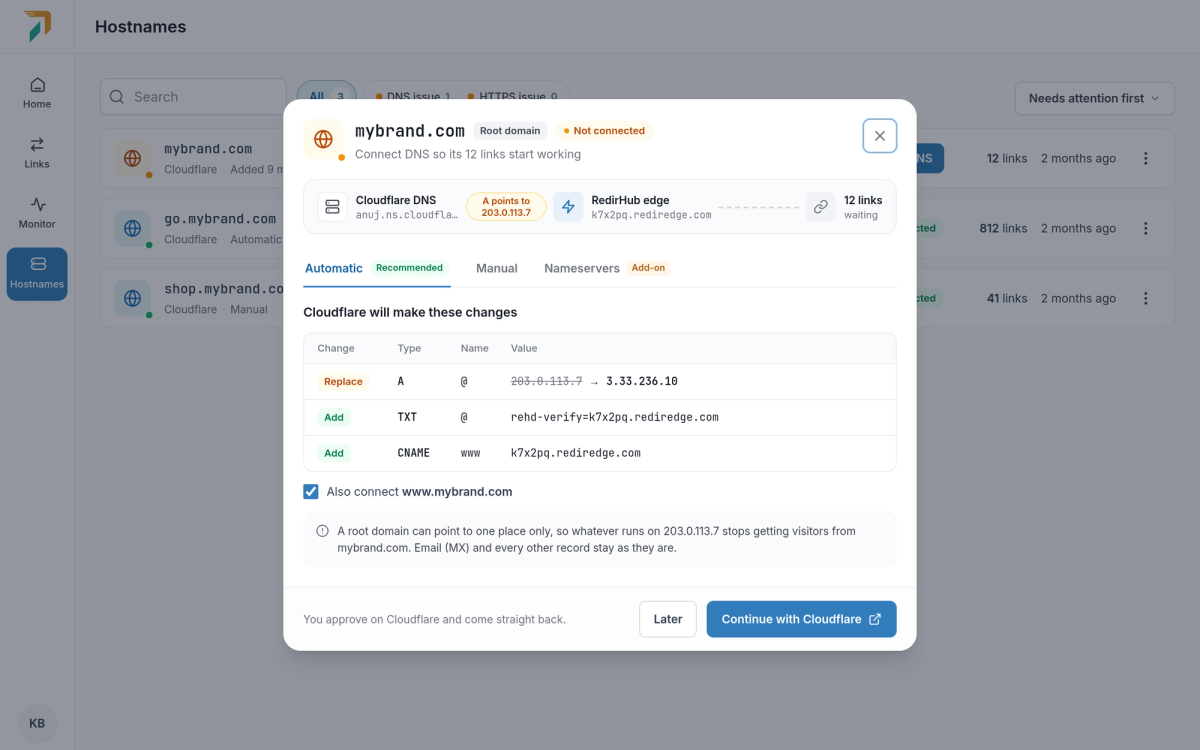
A root domain, with www connected too
Back in RedirHub, we take it from there#
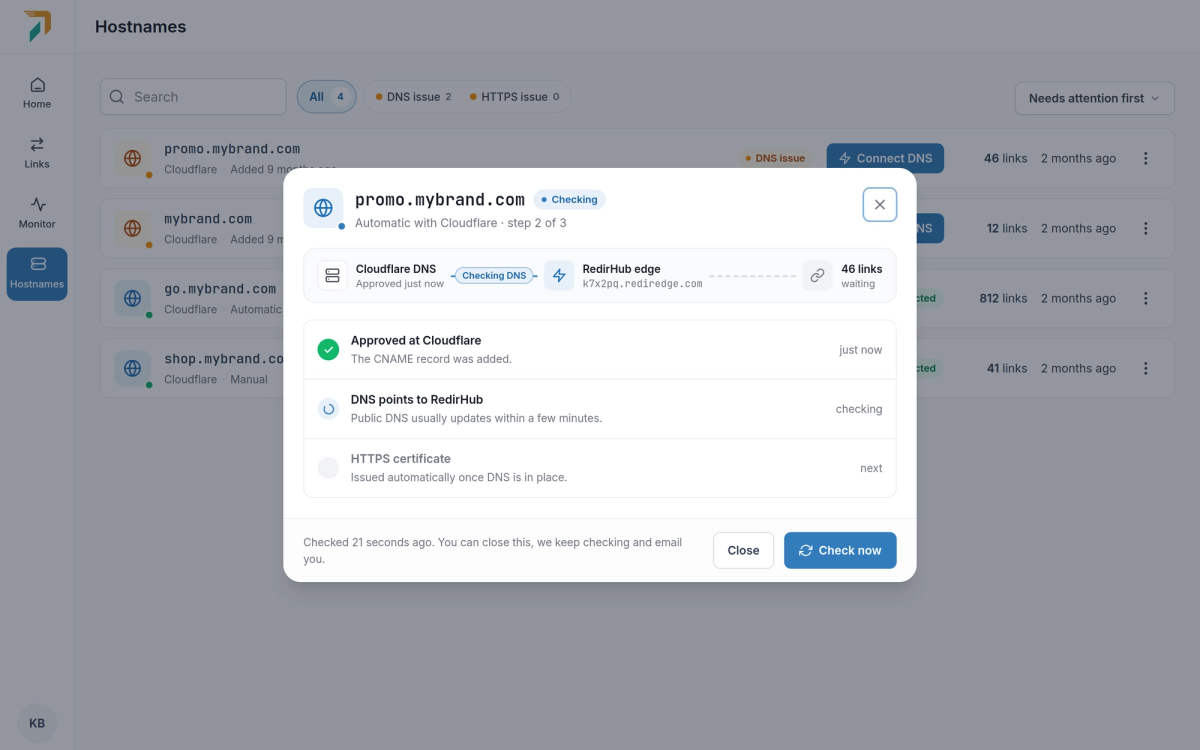
Back from Cloudflare
After you approve, Cloudflare sends you straight back. The window follows each step, from DNS pointing to RedirHub to the HTTPS certificate, and updates by itself. You can close it; we email you when the domain is live.
Manual setup: CNAME or A record#
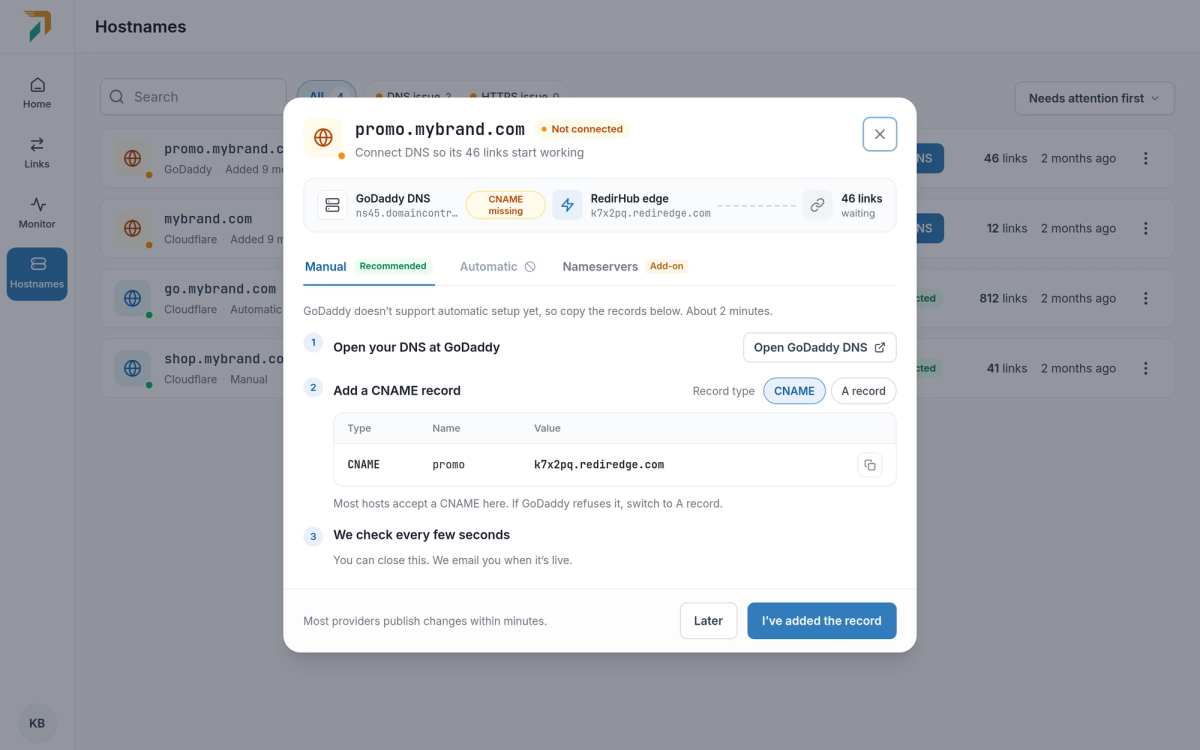
Connect DNS → Manual
For other DNS providers, the Manual tab lists the records to add, with a link to your provider’s DNS settings and a step-by-step guide for the most common providers.
- CNAME by default. It works for most hostnames. If your provider won’t accept it, switch to A record and the records update.
- Root domains. Use an A record, or a CNAME on
@where your provider supports it. Either comes with a TXT record so we can confirm the domain is yours. - Checked as you go. We check every few seconds and tell you which record is still missing.
Automatic setup works with Cloudflare today. More DNS providers that support Domain Connect will follow.
October 1, 2026
Change many links at once
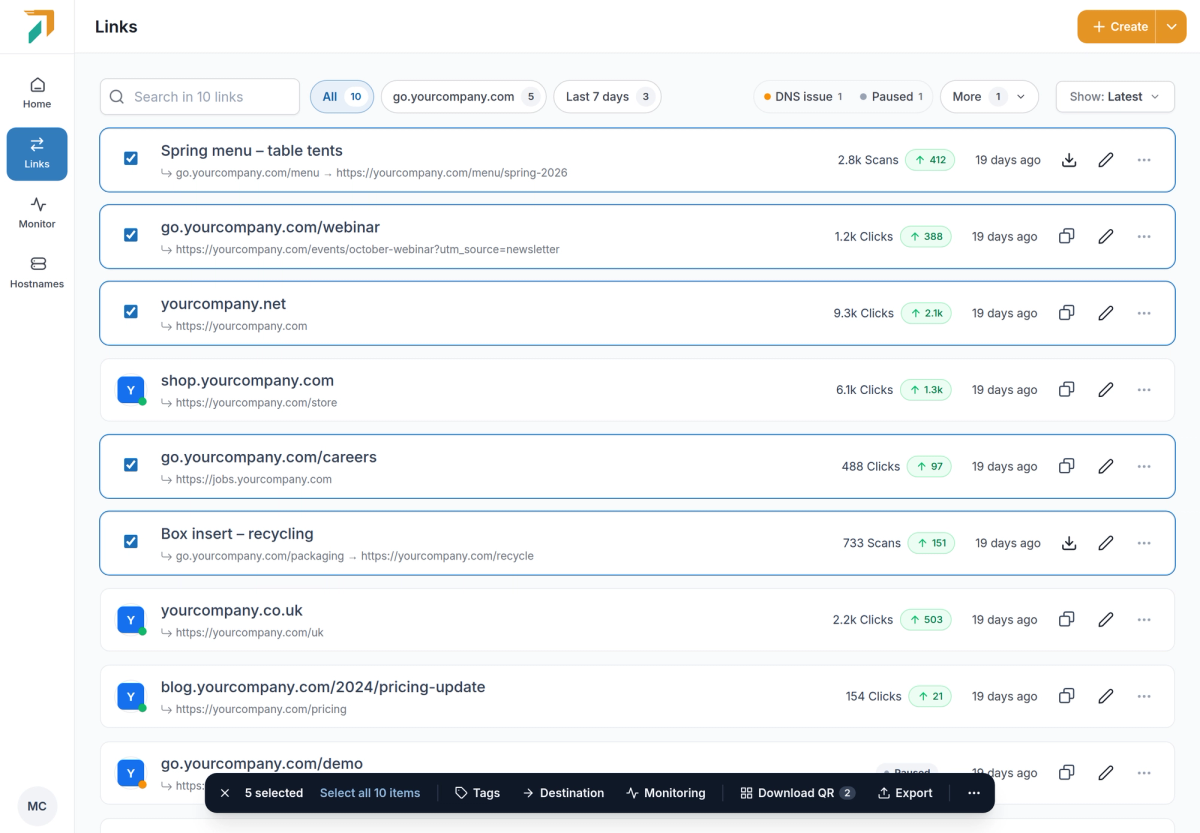
Links → tick the links you want to change
Select links in the Links list, or all links that match your filters, and a bar opens at the bottom of the page. Each action opens a small panel that shows what will happen before anything changes.
Rewrite destinations, with a preview#
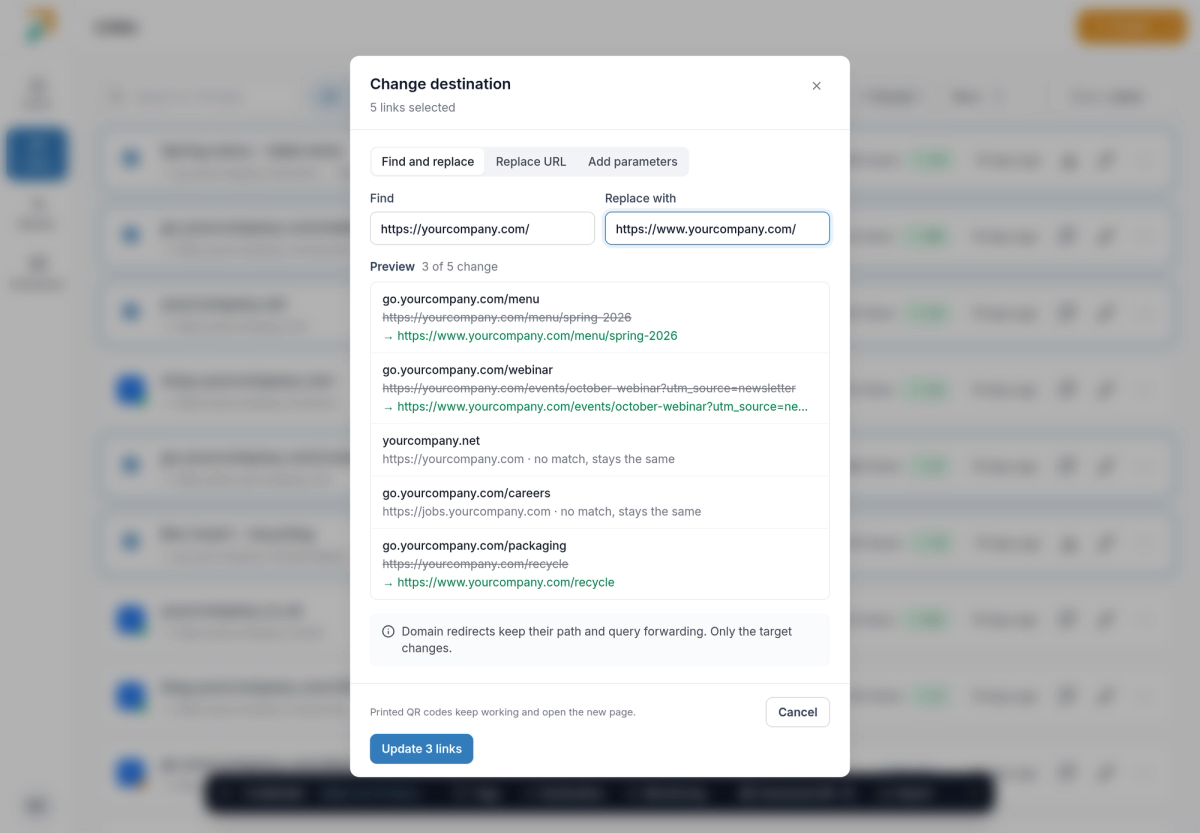
Bulk bar → Destination
- Three ways to change them. Find and replace part of the URL, replace the whole URL, or add parameters such as UTM tags.
- See it first. The preview shows each link’s old and new destination, and which links have no match and stay the same.
- Safe for print. Printed QR codes keep working and open the new page. Domain redirects keep their path and query forwarding; only the target changes.
More from the same bar#
- Tags. See which tags the selected links share, add or remove a tag on all of them, or create a new one.
- Destination monitoring. Turn monitoring on or off for every selected link. Monitoring is part of Pro; turning it off works on every plan.
- Download QR codes. Get the selected QR codes as PNGs, SVGs or a print-ready PDF with one code per page.
- Pause, resume and delete. Under More. Pausing can be undone, and deleting shows how many of the links still get visits first.
Export to CSV or Excel#
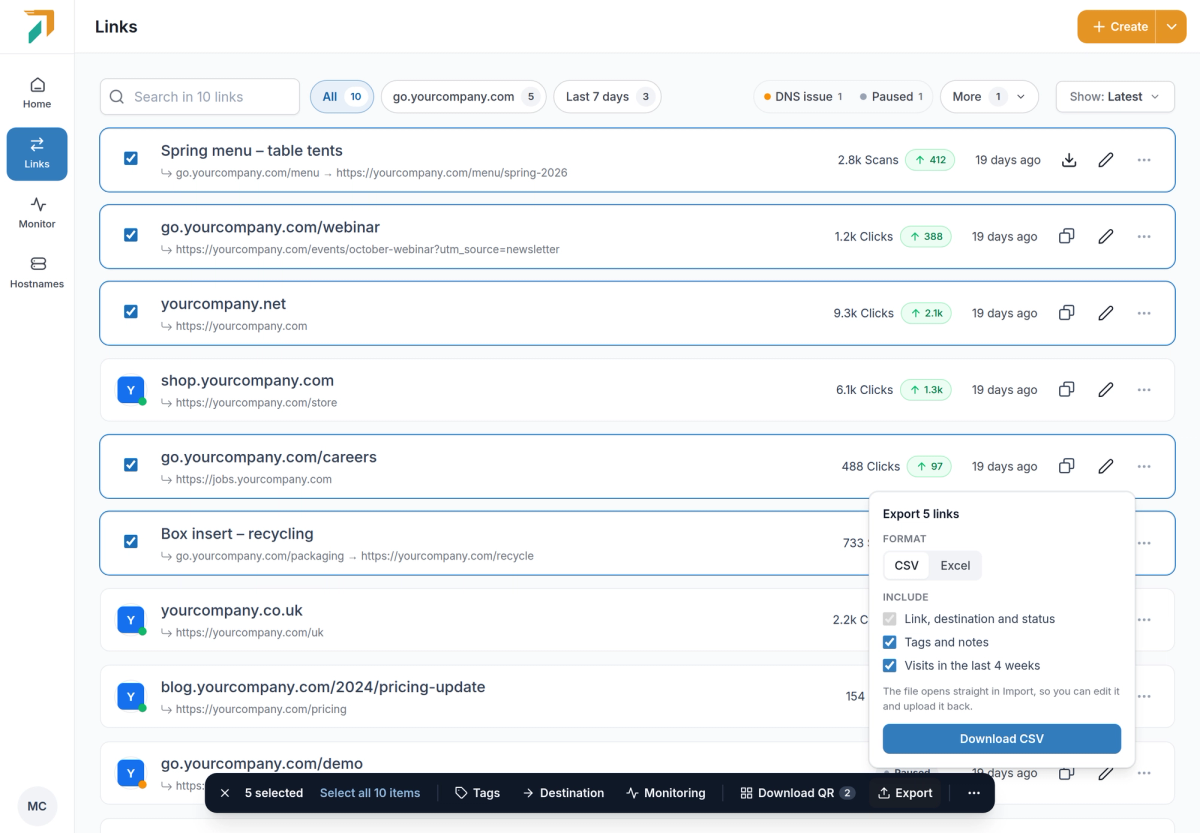
Bulk bar → Export
Download the selected links as a CSV or an Excel file, with their tags and notes and their visits in the last 4 weeks if you want them. The file opens straight in Import, so you can edit it in a spreadsheet and upload it back.
October 1, 2026
One Links page for branded links, QR codes and redirects
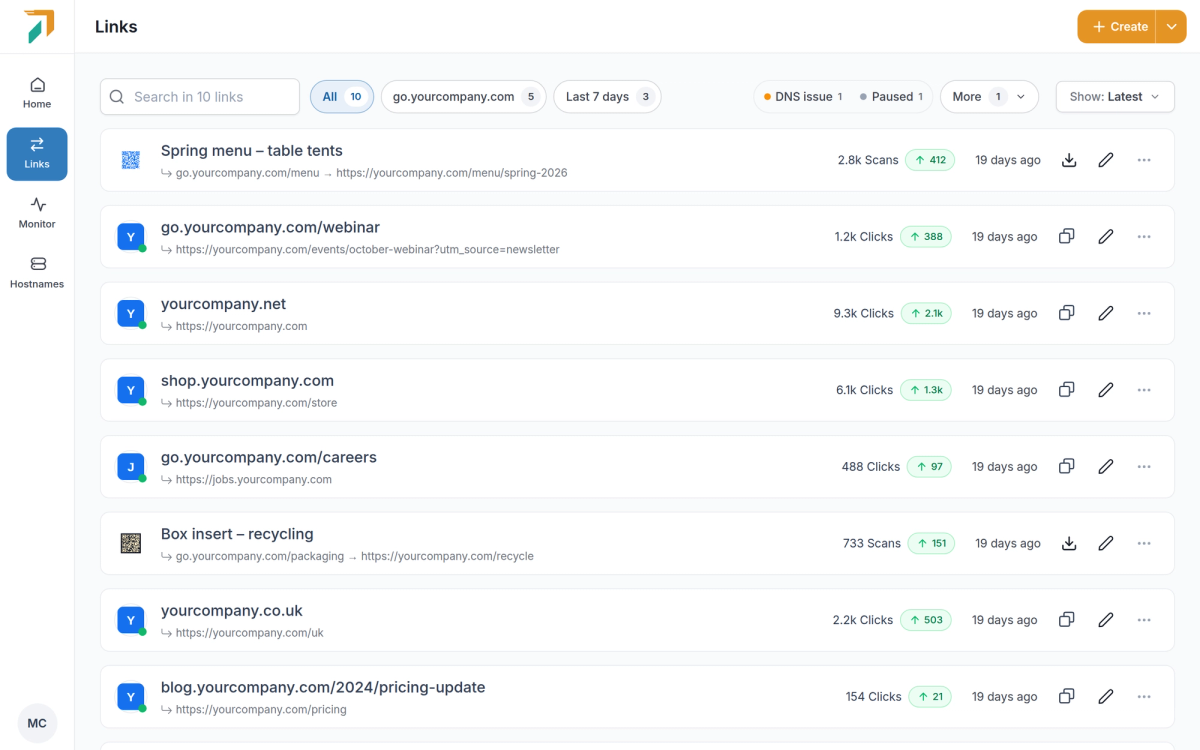
Redirects and Short URLs used to be separate pages. They are now one Links page in the sidebar, where everything you create is listed, searched and managed together. Old Redirects and Short URL bookmarks open Links.
Everything in one list#
- Every kind of link. Branded links, dynamic QR codes, domain redirects and migrations sit side by side, each with its clicks (or scans) and this week’s change.
- Quick filters. One click narrows the list to your busiest domain, links created in the last 7 days, links with a DNS issue, paused links or links with no clicks in 4 weeks. Pin the filters you use most so they stay on the bar.
- Filter by type. Show only branded links, QR codes, redirects or migrations when you need to.
Start from what you want to do#
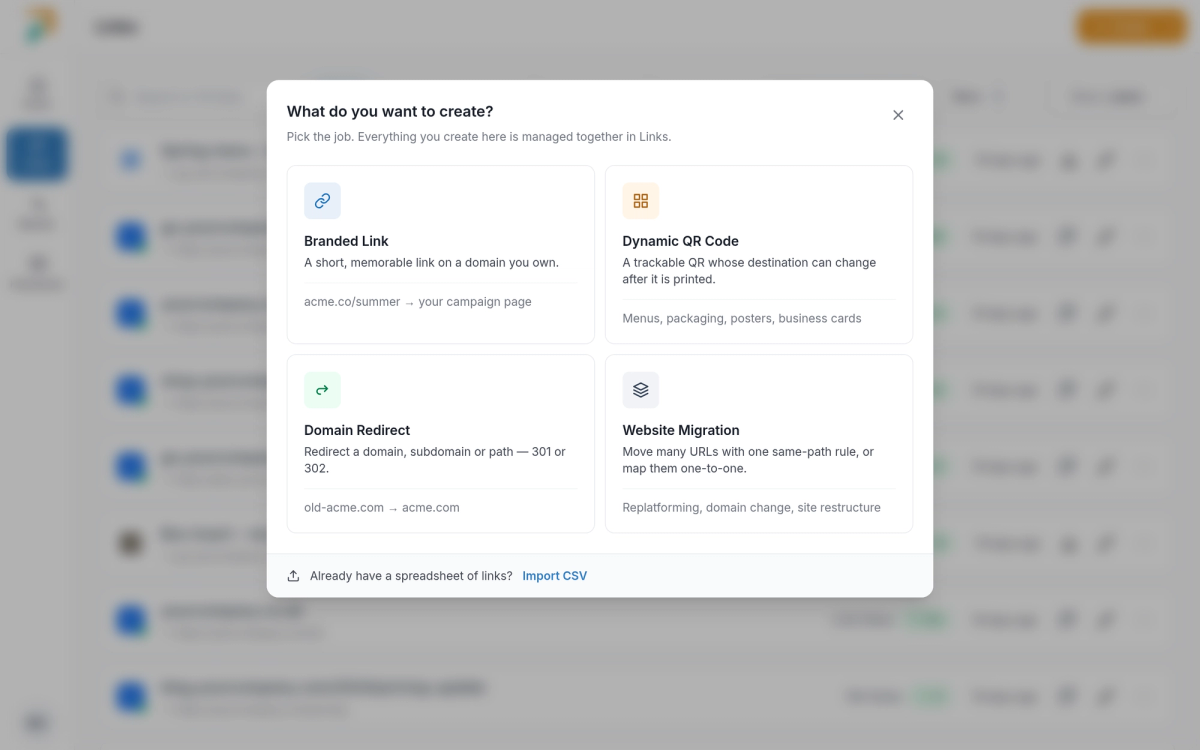
Links → Create
Create asks what you are making and opens a form built for it:
- Branded Link. A short, memorable link on a domain you own. The alias is checked as you type, so you know it’s free before you save.
- Dynamic QR Code. A trackable QR code whose destination can change after it is printed, with a live preview while you style it.
- Domain Redirect. Send a domain, subdomain or path somewhere else with a 301 or 302.
- Website Migration. Move many URLs with one same-path rule, or map them one to one by pasting rows, adding them by hand or uploading a CSV.
QR codes that match your brand#
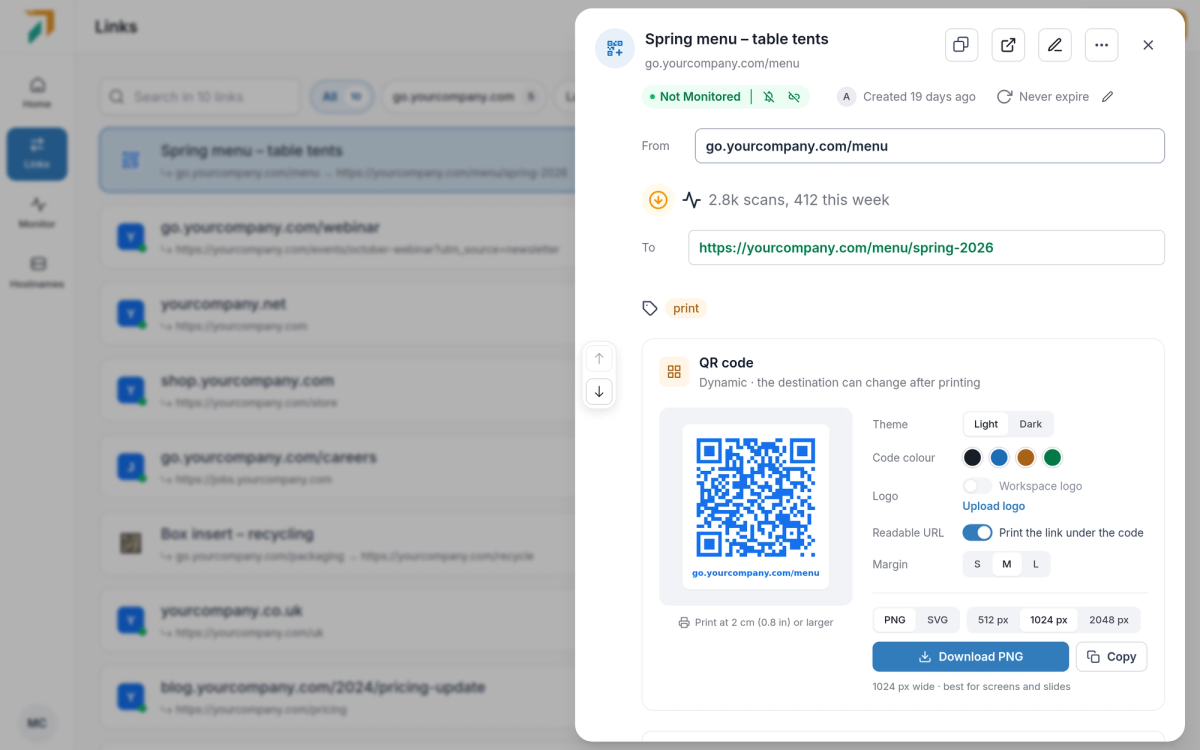
Links → click a QR code to open its details
- Style it. Pick a light or dark theme, the code colour and the margin, and print the readable link under the code.
- Your logo in the centre. Upload your workspace logo once (PNG, JPG, GIF or WebP, up to 5 MB) and turn it on for any QR code.
- Ready to print. Download a PNG at 512, 1024 or 2048 px, or an SVG for print. The code you download is the same one the API and MCP return.
- Change where it goes. Edit the destination any time. The printed code stays the same and opens the new page.
September 30, 2026
MCP 1.1: create links by intent, preview bulk changes, get QR codes
The MCP server at https://api.redirhub.com/mcp/v1 is now version 1.1. It speaks the same language as the new Links page, so your AI agent can do what you do in the dashboard, with the same plan limits.
Create by intent#
create-branded-link,create-qr-codeandcreate-redirectmatch the four create flows in the dashboard; website migrations go throughbulk-import.- Read tools for links, hostnames, the workspace, its members and your account:
list-links,get-link,count-linksand more.
Bulk changes with a dry run#
bulk-update-links and bulk-delete-links first return what they would change. They only apply when called again with the confirmation token from that preview, so an agent can’t rewrite hundreds of links by accident. Bulk updates need a filter, or an explicit choice of all links.
QR codes and history#
get-qr-codereturns the QR code as a PNG, identical to the one you download from the dashboard, style and logo included.get-link-historylists who changed a link and how, on Pro.
Shorter tool names#
Tool names drop the “-tool” suffix, for example get-stats instead of get-stats-tool. The old names keep working, so existing agents need no changes.
September 30, 2026
See who changed a link, and up to 6 months of its traffic
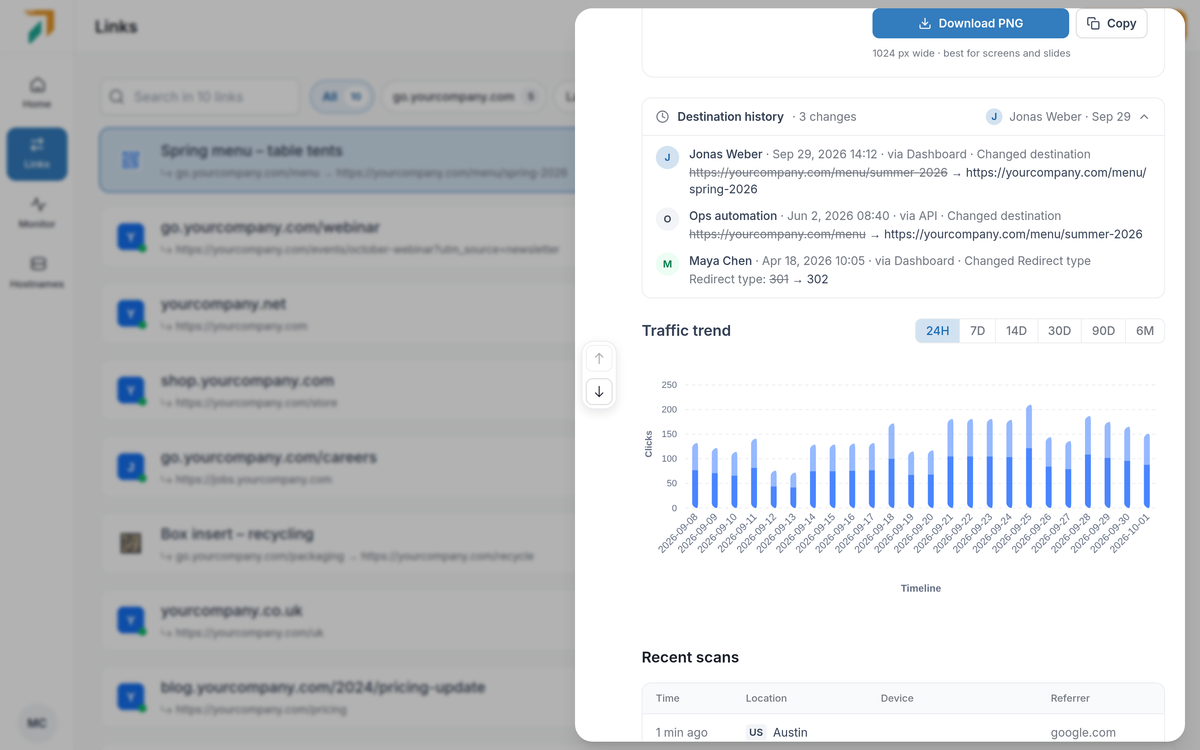
Links → open a link → Destination history
When a link suddenly goes somewhere new, the first question is who changed it. Open any link in Links and the answer is right there, next to how the link has been doing.
Destination history#
- Every change, newest first. Who made it, when, and what changed: the old value crossed out next to the new one, for the destination and every other setting.
- Where it came from. Each change says whether it was made in the dashboard, through the API or MCP, by a CSV import or by Auto-redirect, so automated edits are easy to tell apart.
- Part of Pro. Changes are recorded on every plan. On other plans the link shows how many changes it has, and upgrading to Pro shows them in full.
Longer traffic trends#
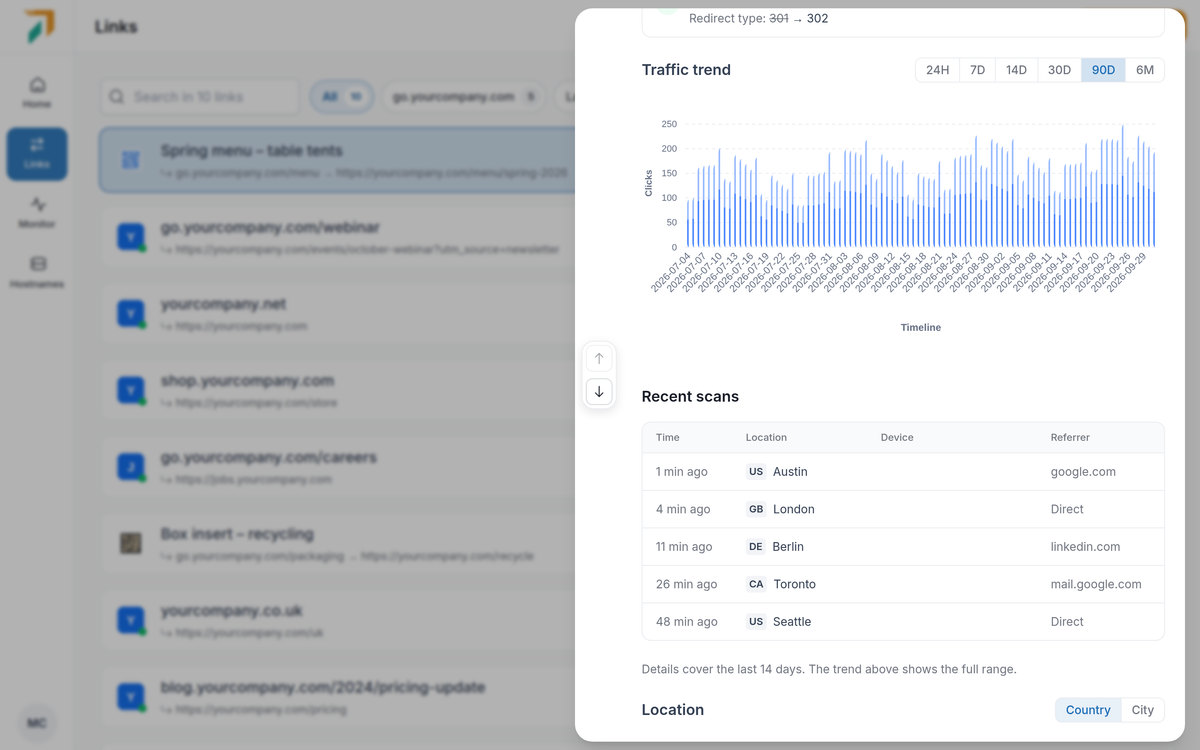
Links → open a link → Traffic trend
- Pick the range. View clicks and unique visitors for the last 24 hours, 7, 14, 30 or 90 days, or 6 months.
- How far back. Paid plans see 90 days of trend; Pro sees 180 days.
- Every report for the last 14 days. Location, technology, domain and referrer breakdowns follow the range you pick, up to the last 14 days. For longer ranges the trend shows the full period and the breakdowns cover the last 14 days. Enterprise keeps detailed reports for longer.
- Recent visits. The latest visits are always listed, even on a quiet link, with their time, location, device and referrer. View all to see more.
September 29, 2026
Pro add-ons, an itemized billing page and renewal links
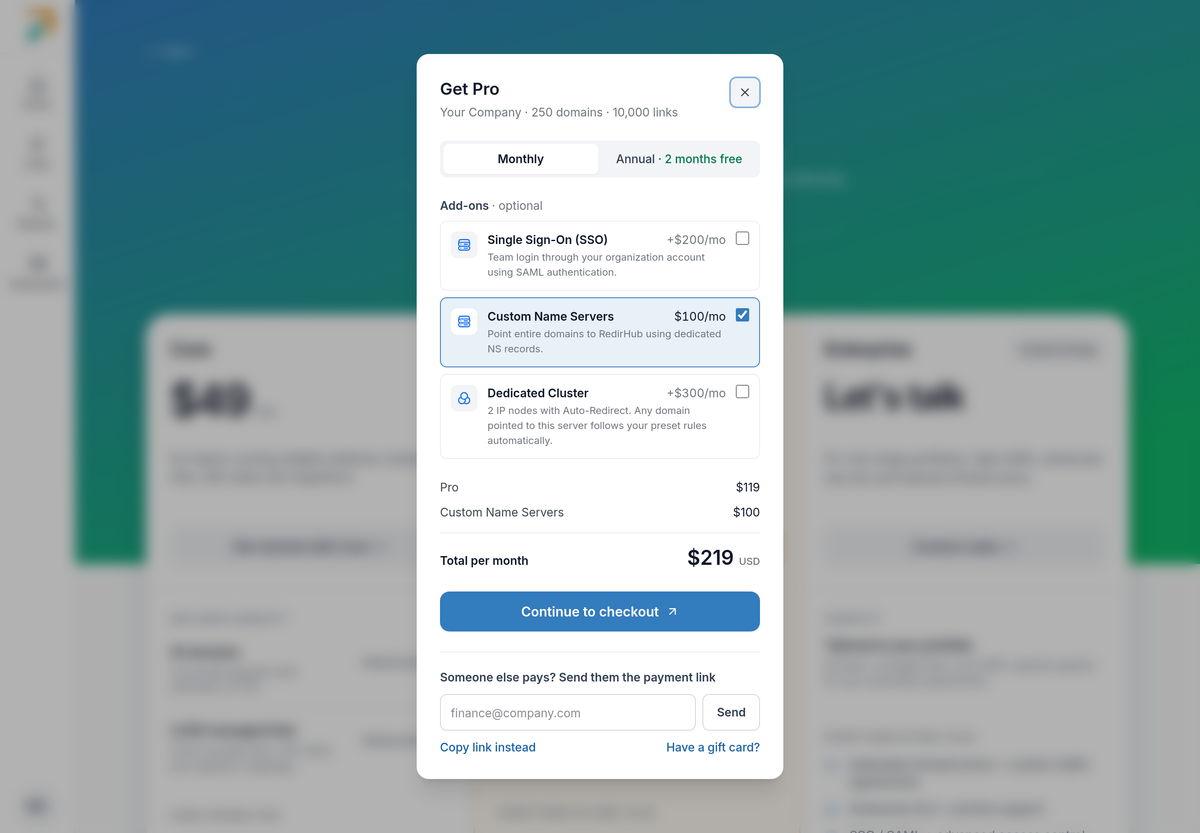
Pricing → choose Pro
Add-ons for Pro#
Features that used to need an Enterprise plan can now be added to Pro, right in the plan dialog on the pricing page. Tick an add-on and the total updates before you check out.
- Single Sign-On (SSO): $200 a month. Your team signs in with your organization account over SAML. We contact you to set it up.
- Custom Name Servers: $100 a month. Point whole domains to RedirHub with dedicated NS records.
- Dedicated Cluster: $300 a month. Two IP nodes with Auto-Redirect: any domain pointed at them follows your preset rules.
All three remain included in Enterprise.
A billing page that adds up#
Billing and invoices, in the account menu, now opens with your plan, its status, the total for the billing period and the next payment date, followed by the plan and each add-on on its own line with its price.
Renew from a link#
- Renew now, from the email. Plans that don’t renew automatically get a Renew now button in the reminder emails before they expire. It opens a secure renewal page, no sign-in needed.
- Pay by card. The page shows the plan, the workspace and the new end date, and the plan renews as soon as the card payment through Stripe is confirmed.
- Safe to forward. Send the link to whoever handles payments. It can only be used to pay for this renewal and doesn’t give access to your account.
Plan notices in the dashboard#
- Heads-up before it matters. Home, Links and Hostnames show a notice when your plan ends within 14 days, when a payment fails (with the card and a link to the invoice), or when a free plan goes over its limits.
- Ask the owner. Members who can’t manage billing can ask the workspace owner to renew or upgrade with one click, and the owner gets an email.
- Clear about paused links. When a workspace goes over its plan’s monthly visits or managed links, the links that stop redirecting are marked “Paused · over plan limit”, and a banner says how many there are. They redirect again as soon as the plan covers them.
September 29, 2026
Let your finance team pay: send a checkout link
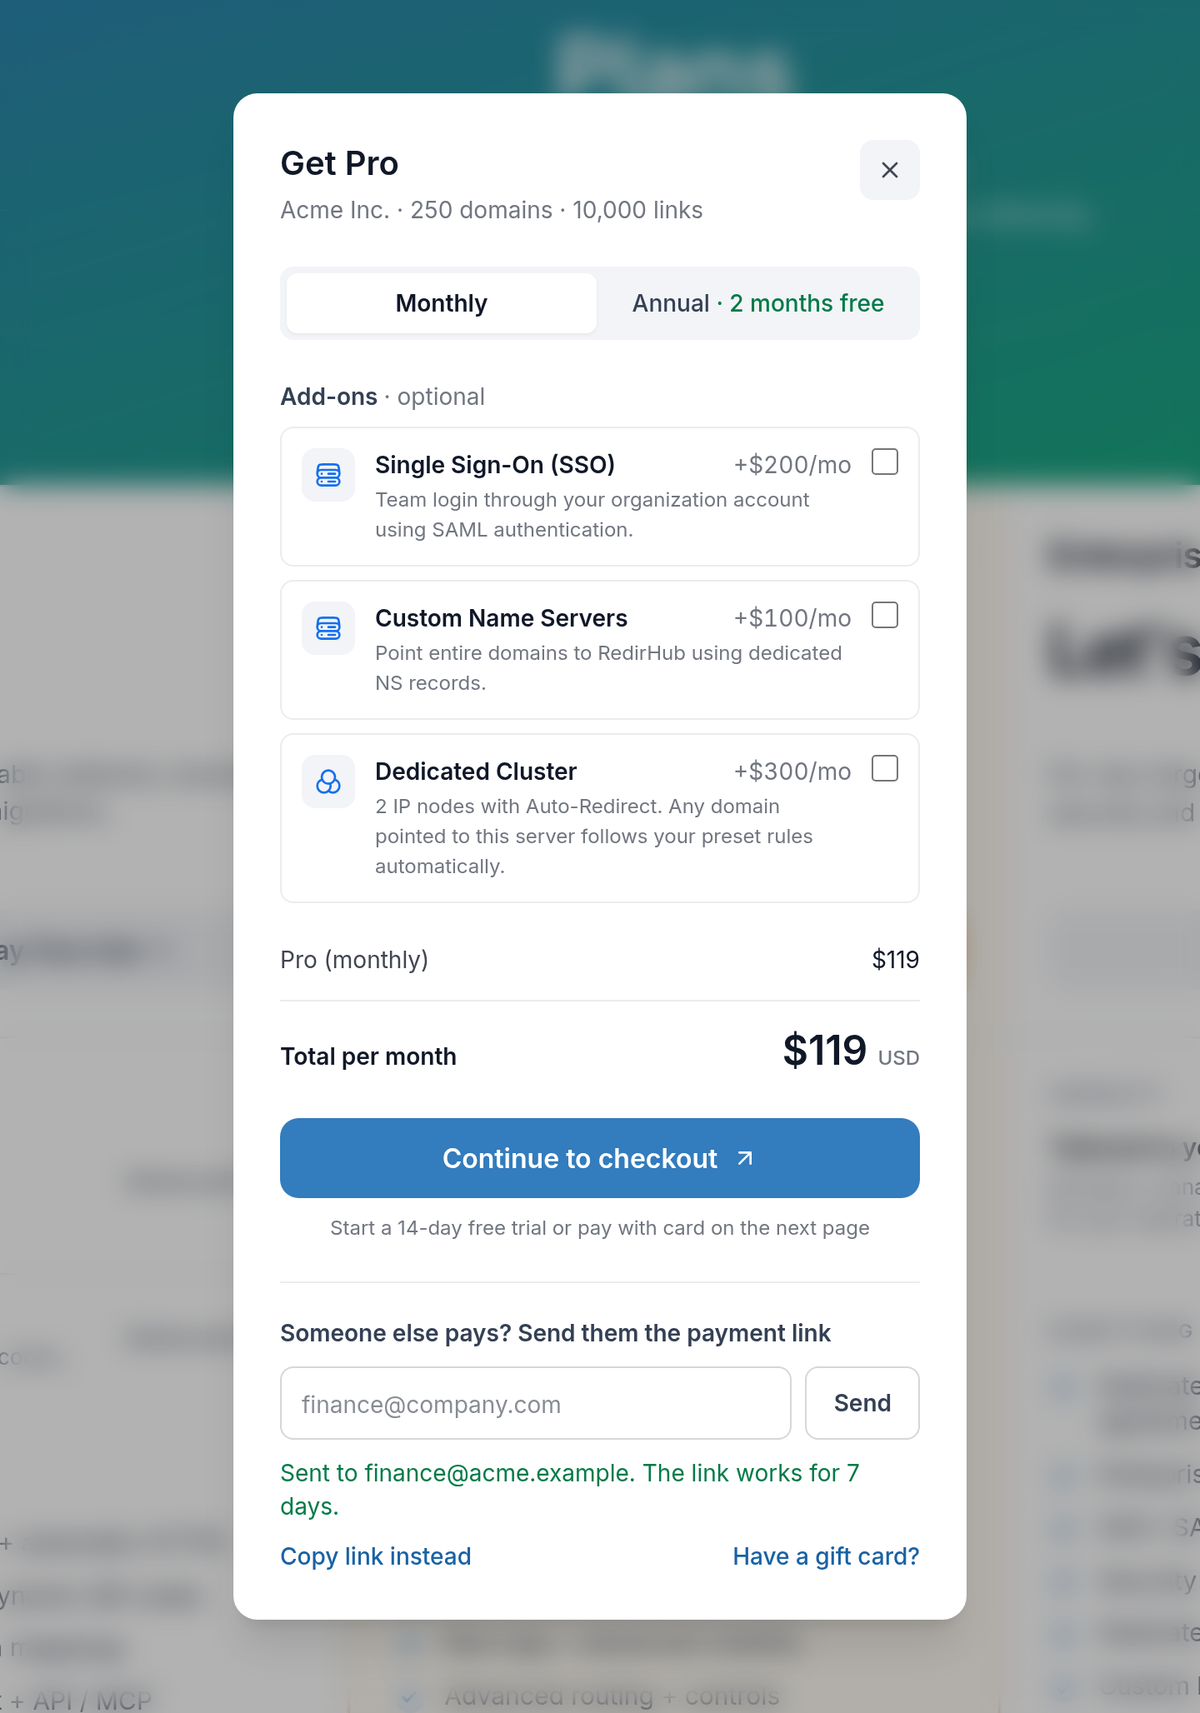
The person who chooses a plan isn’t always the one who pays for it. You can now pick the plan in RedirHub and hand the payment to whoever handles it, such as your finance team, without sharing a login.
How it works#
- Pick a plan. On the pricing page, choose a plan, monthly or annual billing, and any add-ons.
- Send the link, or copy it. Under “Someone else pays?”, enter their email and we send them the payment link. Or copy the link and share it however you like.
- They pay without an account. The link opens a secure checkout page where they pay by card through Stripe. If your workspace is eligible for a free trial, they can start it from the same page.
What your finance team receives#
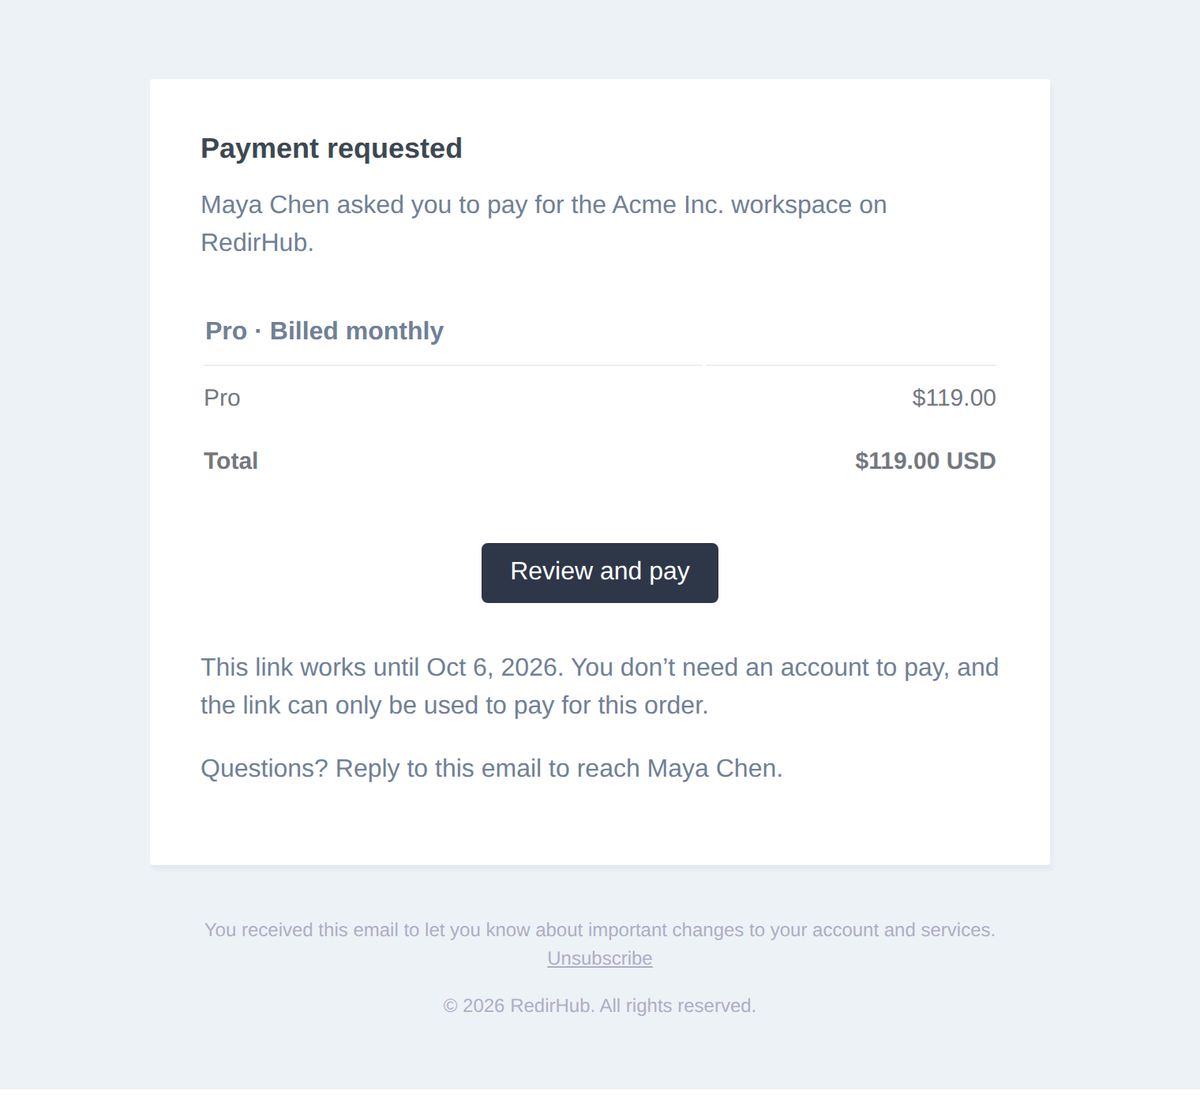
An email that says who asked them to pay, for which workspace, with the plan, each line item, the total and the date the link works until. Replies go straight to you, so questions don’t get lost.
A checkout page made for the payer#
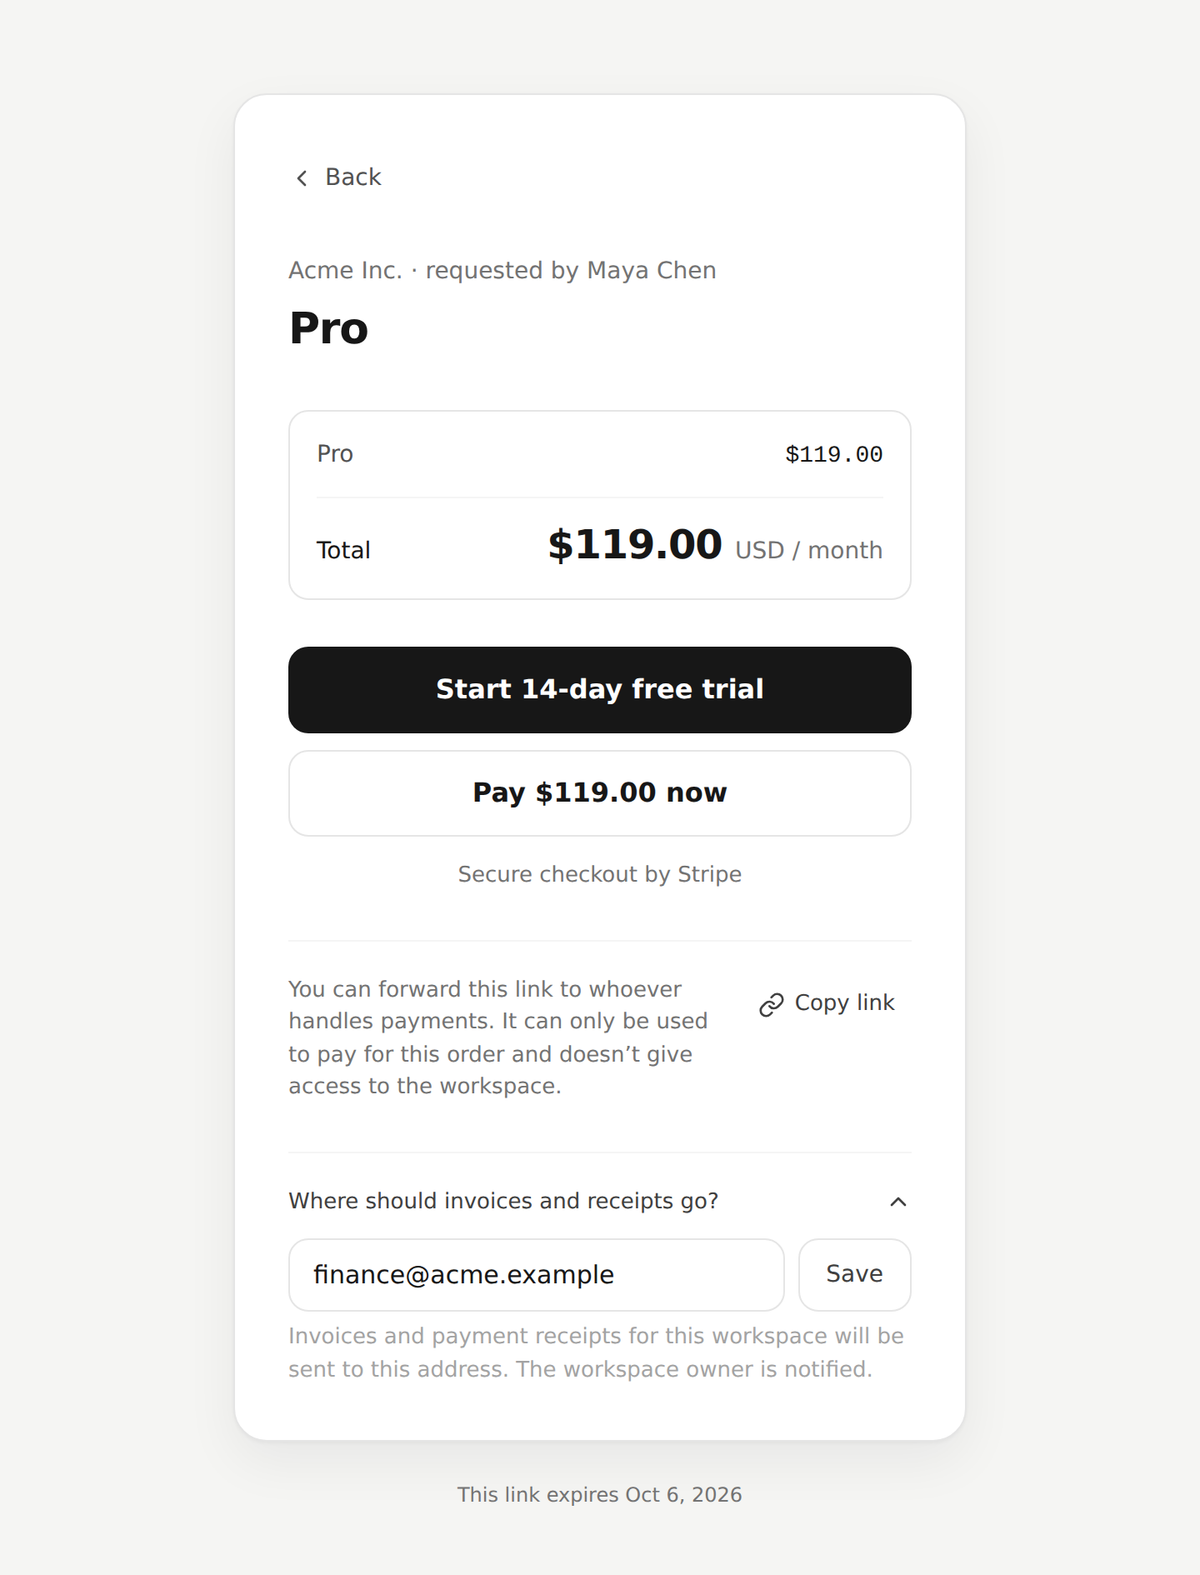
- Clear about what it is. The page shows the workspace, who requested the payment, the line items and the total for the billing period.
- Safe to forward. The link can only be used to pay for this order and doesn’t give access to your workspace.
- Receipts where they belong. If your workspace has no billing email yet, the payer can set where invoices and receipts go, and the workspace owner is told. Receipts go to the payer, the owner and the billing email.
Good to know#
- Links work for 7 days. An expired link tells the payer who to ask for a new one.
- Changed your mind? Pick another plan or add-on and the link you already sent shows the new selection, and works for another 7 days.
- Who can send one. Workspace owners and managers, the members who can manage billing.
- Already subscribed? Change your plan from the dashboard as before. The change is prorated and charged to the card on file.
September 29, 2026
See exactly what a CSV import will change
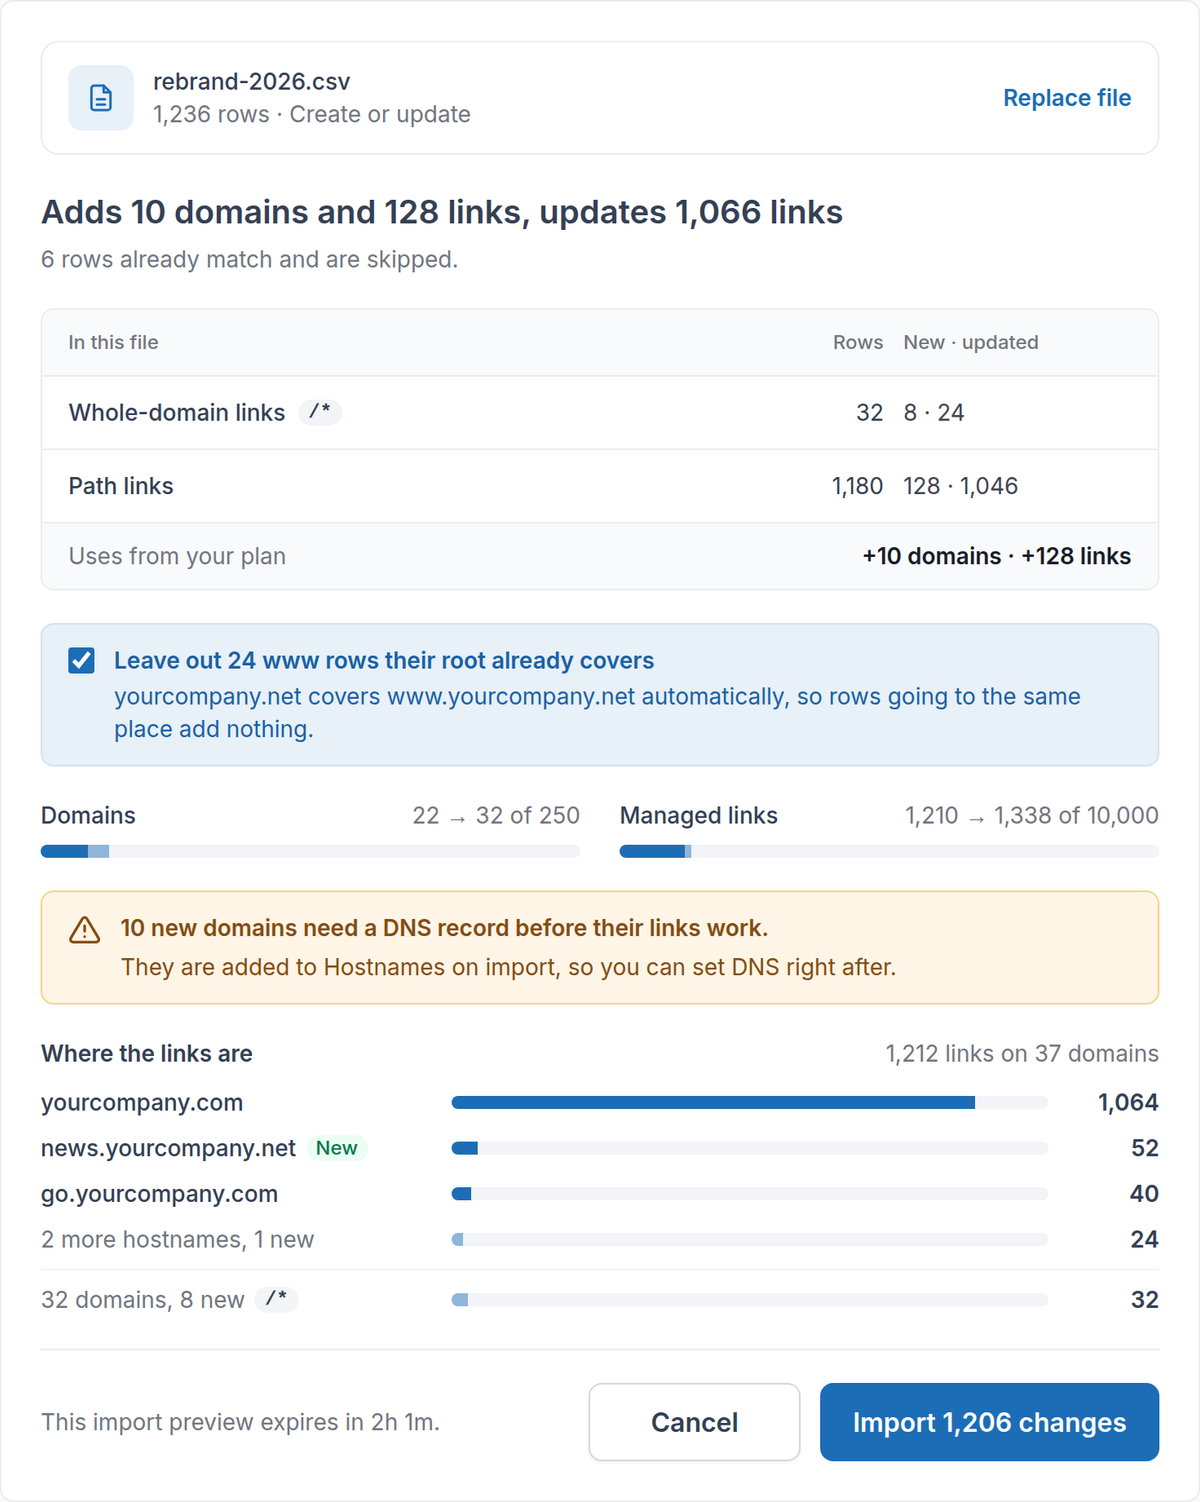
In August, every CSV import became review-first: validate, preview, then confirm. This update turns that review into a full picture of what your file will do, before anything is written.
See what the file changes#
- A one-line summary. The review opens with the result in plain words, for example “Adds 10 domains and 128 links, updates 1,066 links”, then breaks the rows down by kind.
- Unchanged rows are skipped. Rows that already match your links are counted and left alone, so re-importing an export you edited only changes the rows you touched.
- Where the links are. See the hostnames your links sit on, with the rest grouped and whole-domain links listed on their own line.
- No redundant www rows. A domain already covers its www, so new www rows that go to the same place as their root are left out by default. You can keep them with one toggle.
Know your capacity before you import#
- Before and after. The review shows the domains and managed links you use today and what the import would bring them to.
- Only new links count. Updating links you already have doesn’t use capacity, so a full workspace can still re-import its own links.
- A way forward when you’re over. If a file needs more than your plan has left, the review tells you before anything is written, and you can import only the rows on domains you already have.
Fix errors without starting over#
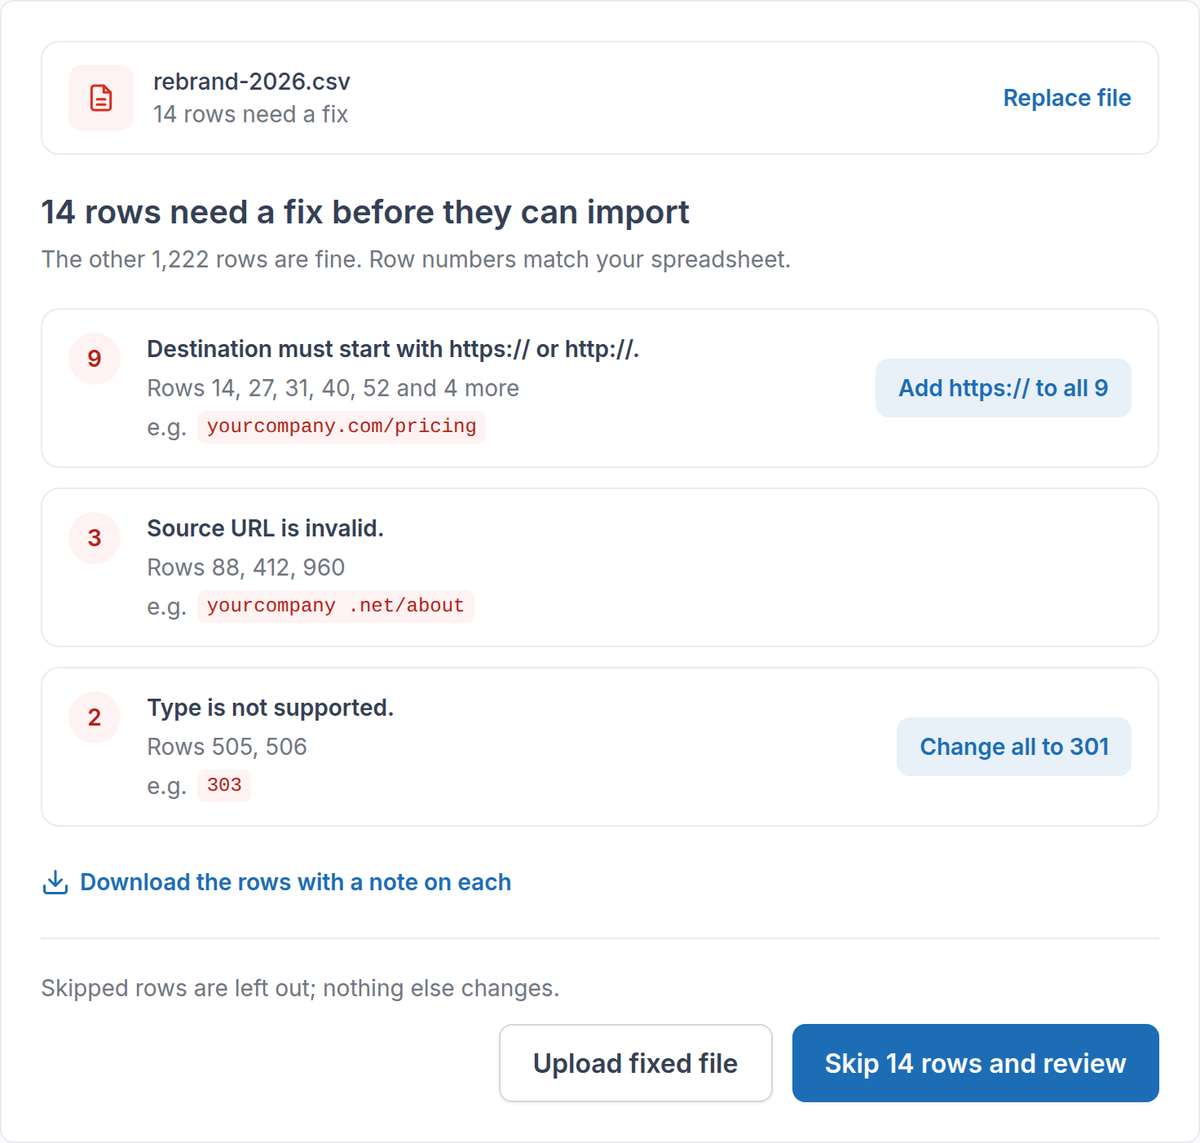
- Grouped by cause. Errors are grouped by what’s wrong, with an example value and row numbers that match your spreadsheet.
- One-click fixes. Add a missing https:// to every destination, or fix unsupported redirect types, and the file is checked again.
- Take the problem rows with you. Download just the rows that need a fix, each with a note on what to change.
- Or skip them. When the other rows are fine, skip the rows with errors and import the rest.
Spreadsheet exports just work#
Exports from Excel, Google Sheets and Numbers import as they are: commas, semicolons or tabs, with or without Excel’s byte order mark, and with accented characters from Excel’s plain CSV format.
After the import#
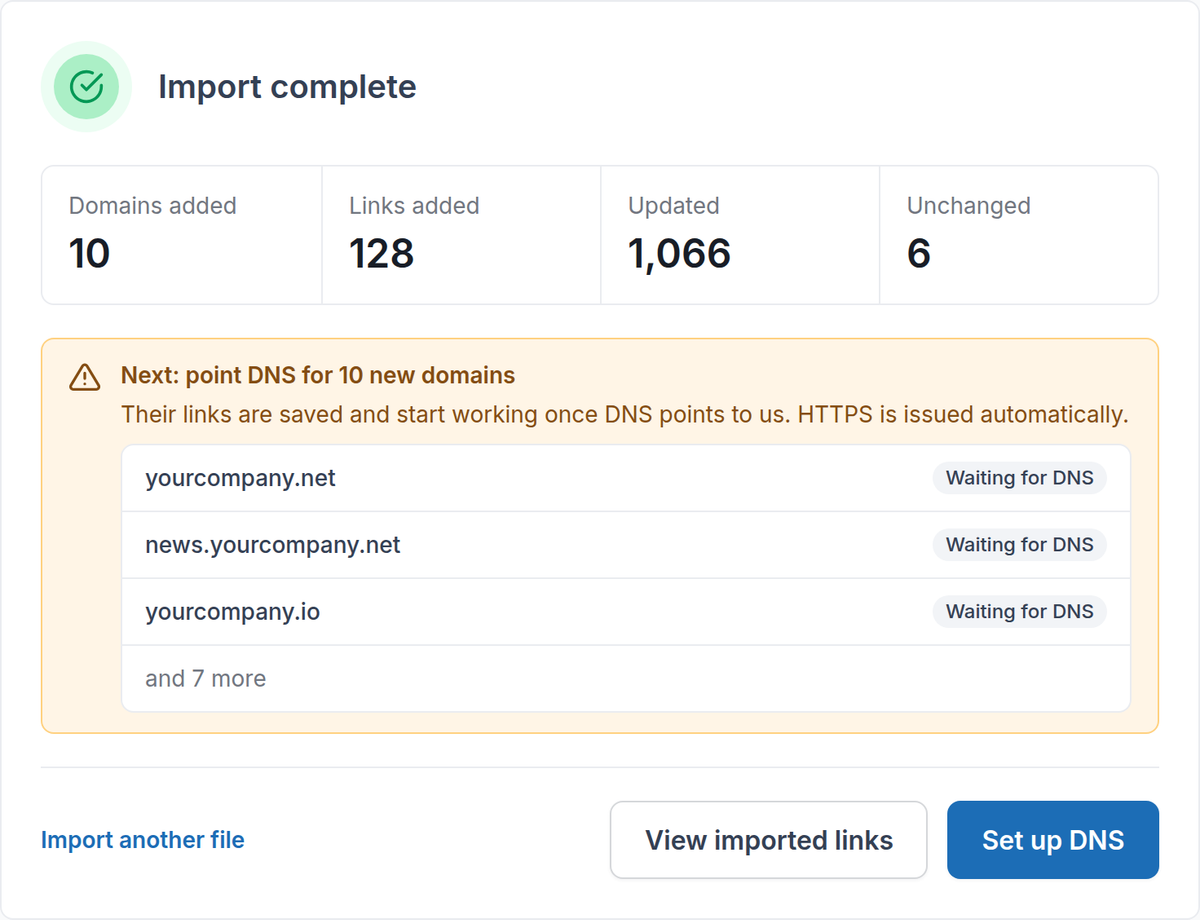
- Real progress. The progress bar follows the rows actually written.
- A clear result. See the domains added and the links added, updated and unchanged.
- DNS as the next step. New domains are added to Hostnames, and the result links straight to setting up their DNS. Their links start working once DNS points to RedirHub, and HTTPS is issued automatically.
Removing links with a CSV#
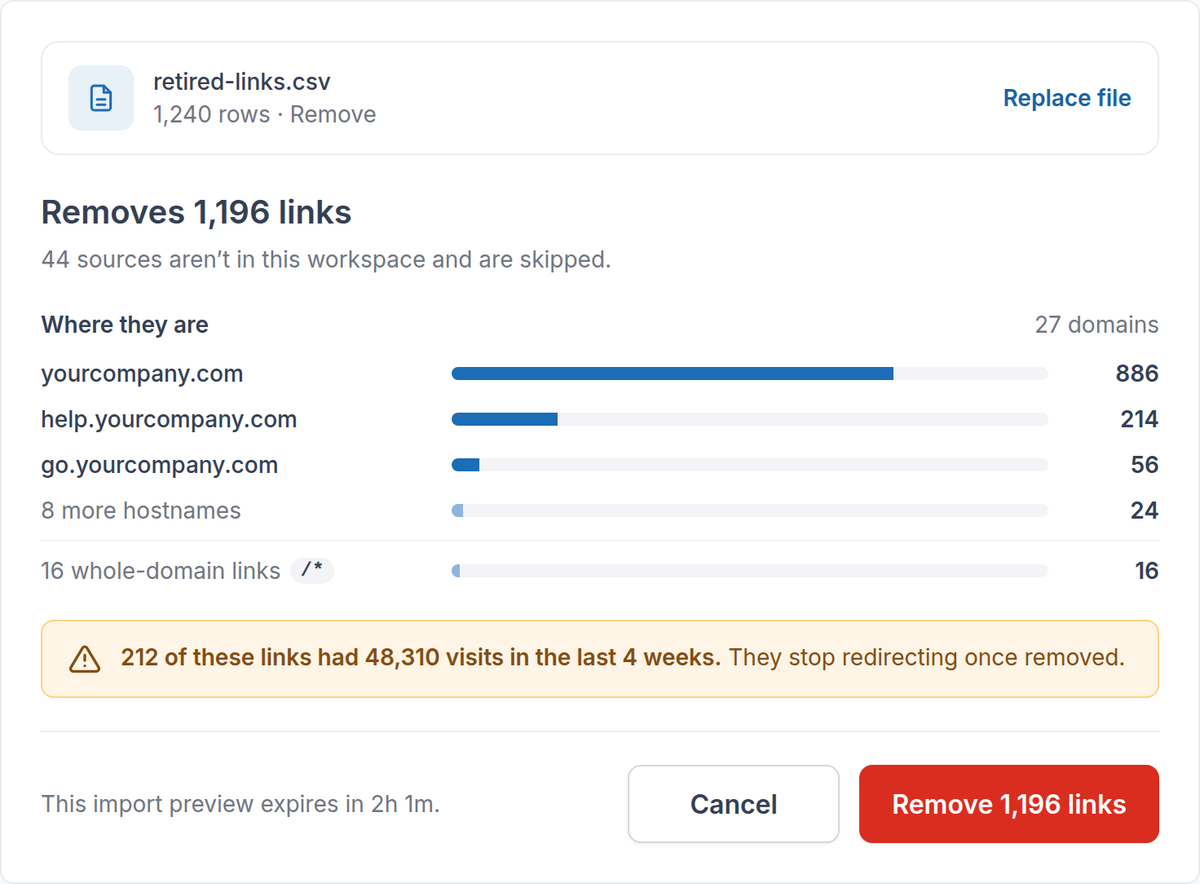
Before a removal runs, the review shows where those links are and how many of them had visits in the last 4 weeks, because they stop redirecting once removed. Sources that aren’t in your workspace are skipped.
August 19, 2026
Review CSV imports before they make changes
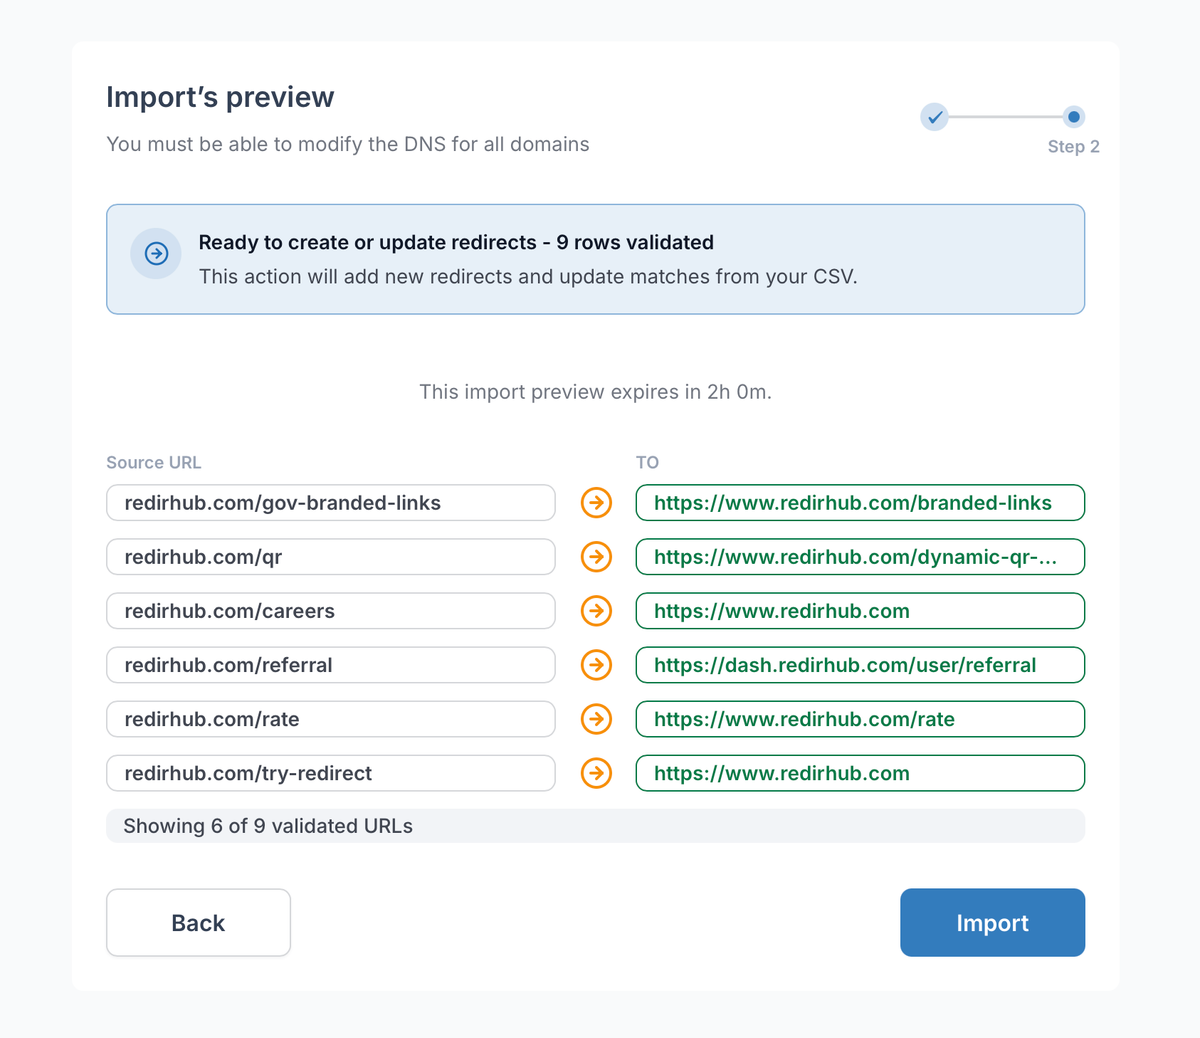
Bulk importing redirects should be predictable—whether you’re updating a handful of URLs or a much larger CSV.
With this update, every CSV import now follows the same review-first flow:
• Validate before importing — We check your CSV before any redirect is changed. If there’s a problem, you’ll see the affected rows and what needs fixing.
• Preview before committing — Review your import before applying it to your workspace.
• One consistent workflow — Small and large CSV files now use the same import experience.
• Prevent duplicate imports — Once an import has started, it can’t be accidentally submitted again.
• Clear completion status — Follow the import status in the dashboard and receive a confirmation when it finishes.
This update also applies the same review-before-change approach to CSV-based redirect deletions.
June 16, 2026
MCP Update — Analytics, Access Logs & Unified Domain Connection
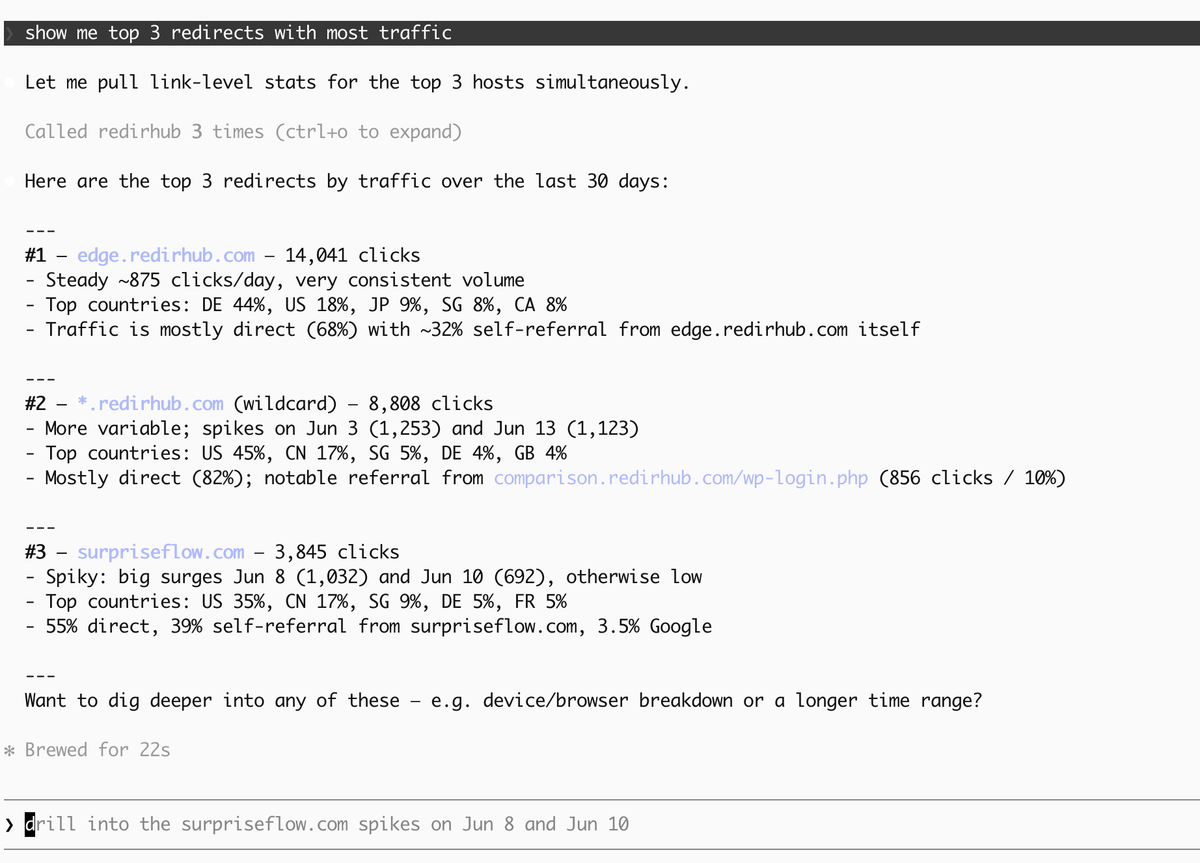
top 3 redirects with most traffic
We've shipped four major improvements to the RedirHub MCP (Model Context Protocol) platform this week — bringing powerful new analytics capabilities, a streamlined domain connection workflow, and full tool visibility to every AI agent integration.
All updates are live on MCP v1 and available on every plan.
📊 New: get-stats-tool — Redirect Analytics in Your AI Agent#
Query redirect click statistics directly from your AI agent — no dashboard switching required. The new get-stats-tool supports both link-level and organization-level analysis with flexible breakdowns.
Capabilities:
- Total clicks with time-range filtering
- Click trends over time (hourly/daily/weekly)
- Breakdowns by country and redirect handler type
- Single link or full organization scope
- Parallel async queries for fast responses
🔍 New: get-access-logs-tool — Raw Access Log Query#
Go deep on your redirect traffic with the new get-access-logs-tool. Query raw ClickHouse access log records with rich filtering — perfect for debugging, security auditing, and traffic analysis.
Filters: file, country, redirect handler, browser, device type, referrer, IP address, user agent
Includes cursor-based pagination for large result sets and a bot_free mode that excludes crawler traffic for cleaner analysis.
🔗 Unified: connect-host-tool — One Tool for Every Domain Type#
We've merged create-host-link-tool and delete-host-link-tool into a single, intelligent connect-host-tool. One tool handles root domains, subdomains, and wildcard domains — automatically choosing the right DNS verification method.
- Root domains, subdomains, and wildcards — all in one tool
- Optional short_url and HTTPS request parameters
- Wildcard domains auto-filter CNAME records per RFC spec
📋 Fix: All 17 Tools Now Visible in tools/list#
A pagination bug was silently capping the tools/list response at 15 tools — hiding the last 2 tools (get-stats-tool and get-access-logs-tool) from AI agent discovery. We've increased the page size to 50, so all 17 MCP tools are now properly visible to every connected agent.
Getting Started#
All updates are live now on the MCP v1 endpoint. Visit your dashboard API settings, generate an API token, and connect your AI agent to https://api.redirhub.com/mcp/v1. If you're new to MCP, check out our setup guide to connect RedirHub to Claude, Cursor, or Codex in under 5 minutes.